
5 Tips with Software Solutions to Edit YouTube Videos
What’s better than a great video on YouTube to help you improve your brand and web presence? A great-looking YouTube video that does all that stuff even better!
Think you have to have some fancy-schmancy video editing software to do it and spend hours learning to use it? Well, that helps, but YouTube’s very own video editor is actually EXTREMELY easy to use and can really help you polish up that iPhone video you just posted 😉
First: Get to the Editor!

There are a couple of ways to start using YouTube’s video editor, and actually two different versions you can use. One way is to sign in and visit www.youtube.com/editor, where you’ll find your videos posted and ready to be dragged and dropped into the editing area.
Second, you can open your video manager and simply click “Edit.” Either go to “Enhancements” from the dropdown, or click it’s tab after you visit the “Info and Settings” page.
These may look different and may have some varying wording, but they are essentially the same. The second way has some nice previews of enhancements you can apply right next to it with a side-by-side display of before and after. Really, the first option comes with all the same stuff, just that you can conceal and find them in tabs and click-boxes. It also has an audio-drag feature you might want to use to throw in some over-dubs, fly beats, sick licks, or thumpin’ jams – whatever you’re into…
Second: Experiment
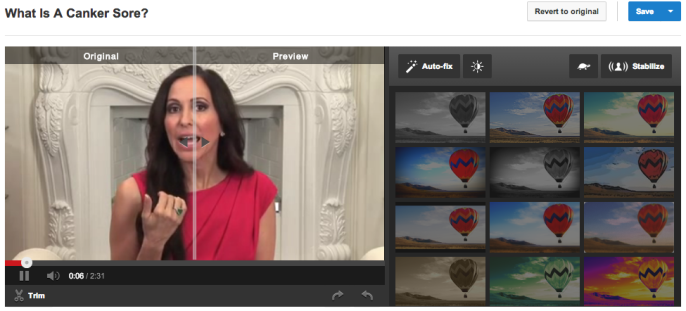
Whichever method you choose, I whole-heartedly recommend you use the side-by-side preview. Getting to see styles applied in real time with comparison to the original is a HUGE help.
Start messing around with styles until you find one you like. I recommend using a consistent style you really love so all your videos have a similar look/feel.
Third: Fix It Quick

Start by getting all your quick fixes in order.
Hand a little shaky while recording? Get it stabilized. Need to hone in on something in the video, or expand it out? Use the pan and zoom features. In the name of experimentation, try toggling the brightness and contrast, testing out extremes in each until you land on something that looks significantly better than the original. You may not know how much work a video needs until you see how much better it can be!
Fourth: Add Text
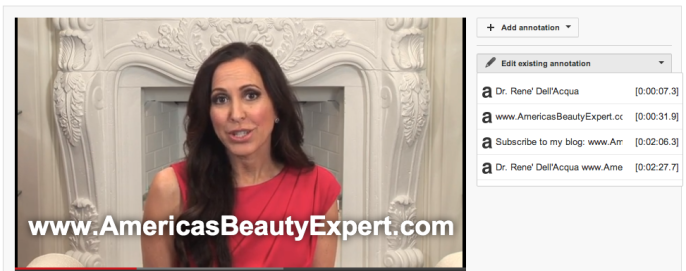
It’s easy to make yourself a star with professional-looking text overlays at any point in your videos. I love to add website URLs or social media URLs when they are mentioned. And of course, the person’s name as they are reporting. You can simply add text in the ‘annotations’ settings. Add CTAs (Call-To-Actions) or COs (Call-OuTs) to encourage viewers to take an action or simply point them in the right direction.
Of course annotations will vary per video and shouldn’t be included in all cases. {Or at least that’s my opinion.}
Fifth: Publish!
That’s it!
BONUS TIP!
Of course as nice as all this is, this is really a beginner’s way to edit process videos, and there’s a lot more you can do with real video editing software.
But before you run out and hire an expensive editor and pay four figures for top-notch software, try it out yourself on your next video with some free software. Your computer probably comes with something basic like Move Maker (on Windows), Final Cut or iMovie (on Macs), or maybe your computer came pre-installed with the Adobe creative suite.
Just start toggling around with these before you post and see what you think. You can’t do this with videos already posted to YouTube unless you want to re-post, and if that’s what you’re looking to do then YouTube’s video editor will be your best bet.
Now that you’re an editing pro, be sure to see our past posts on using YouTube to power your social media marketing efforts! In the meantime, peruse the rest of our posts here, and learn it all from Las Vegas’s social media marketing master!


Post a Comment
You must be logged in to post a comment.